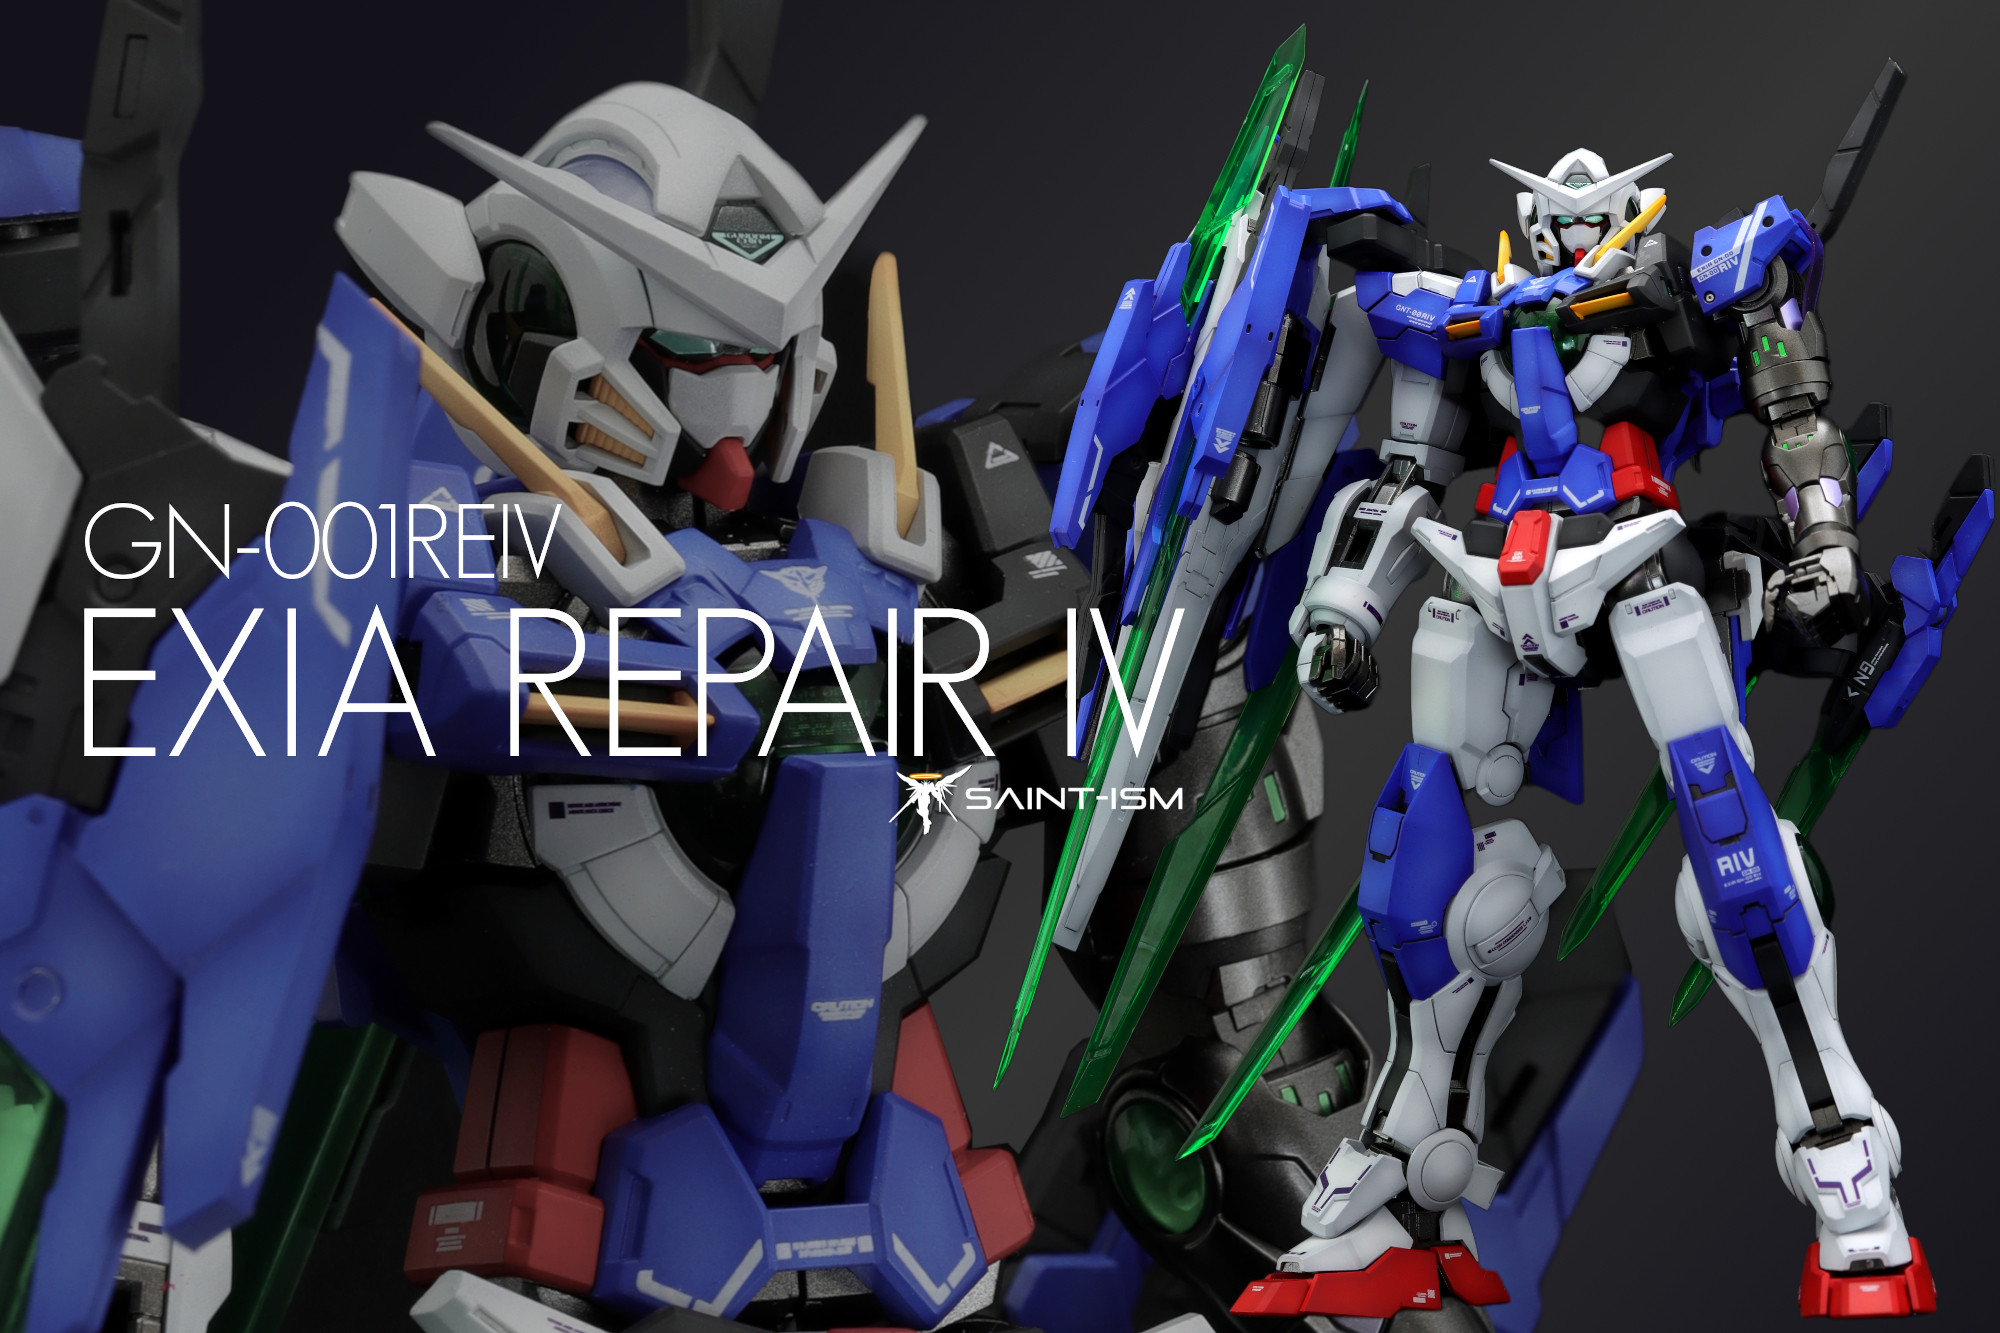
I never really heard of the Exia R4 design until Susan Model announced their expansion set, after seeing it I really wanted to give it a try. For this build I used the P-Bandai Exia Repair III as that had the knees for the R4 that isn’t included in the set, but more on that later.
So some notes on the Susan Model parts. At first pass they feel more like ABS plastic rather than PS, and while I could not confirm this I treated them as ABS just in case. Some parts are undergated and while in some places this is great, it feels more like a flex than a necessity.
The expansion set is compatible with the Bandai/Daban/Hobbysearch Exia, Qan[T] and Astraea and you get variations of attachment parts that you’ll need to swap out depending on which base kit you are using. Canonically the shield sits over the right arm and the left arm is the metallic replacement, but the replacement parts don’t lock you in and you can choose either side for both. You get:
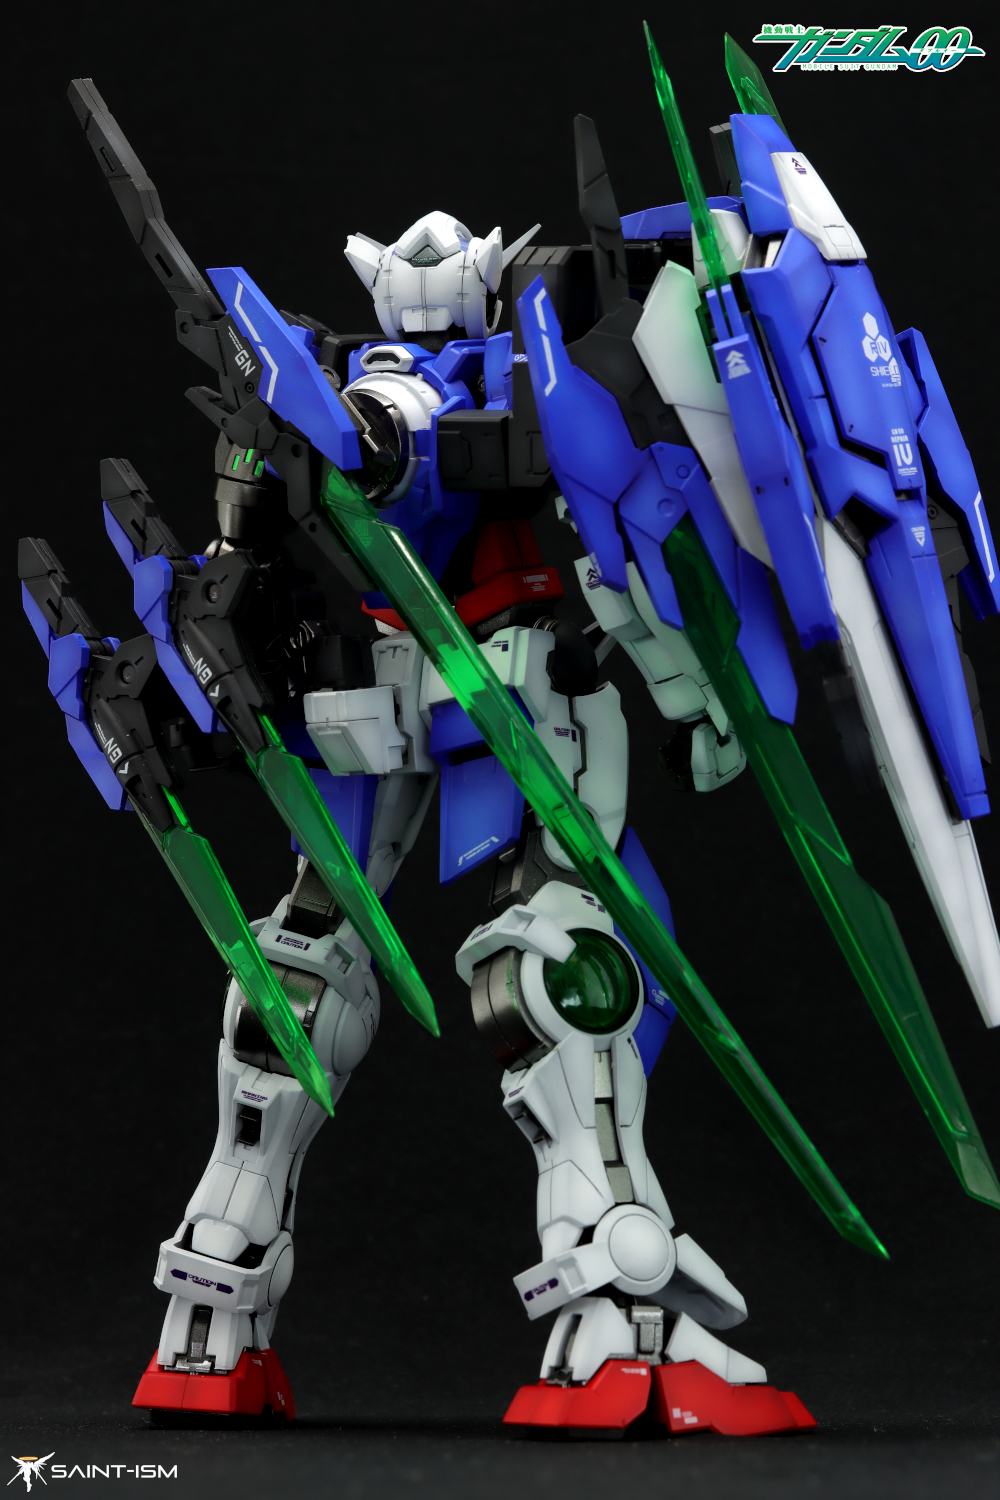
- a replacement back skirt with mounting ports for the 2 GN Bayonets
- a replacement arm, hands and shoulder which can be used as either a left or a right arm
- a clear version of the replacement arm minus the shoulder (first print only)
- a GN Shield
- 2 GN Battle Blades
- 2 GN Battle Swords
- 2 GN Bayonets that attach via the arm on the back skirt
- a GN Tachi which attaches onto where the GN drive normally sits in the back.
- a replacement shoulder armour for the opposite arm, this reuses the frame from your base kit
- mounting parts needed to attach the GN Shield like Qan[T]
- a decal sheet with R4 markings
- a sticker sheet for the replacement arm
This however does not get you a fully accurate R4. In particular you’re still missing the blue knee armor from the Exia R3, and even with those, you’ll still need to do the following:
- The yellow ‘clavicles’ on the chest are much shorter on the R4.
- The R4 uses a white chest armor similar to the Qan[T], even if you take the piece MG Qan[T]’s piece will not fit without modding, and the antannae need to be trimmed a bit.
- The R4 seems to use a side skirt similar to that of the Qan[T], however there’s no easy way to get this without modding
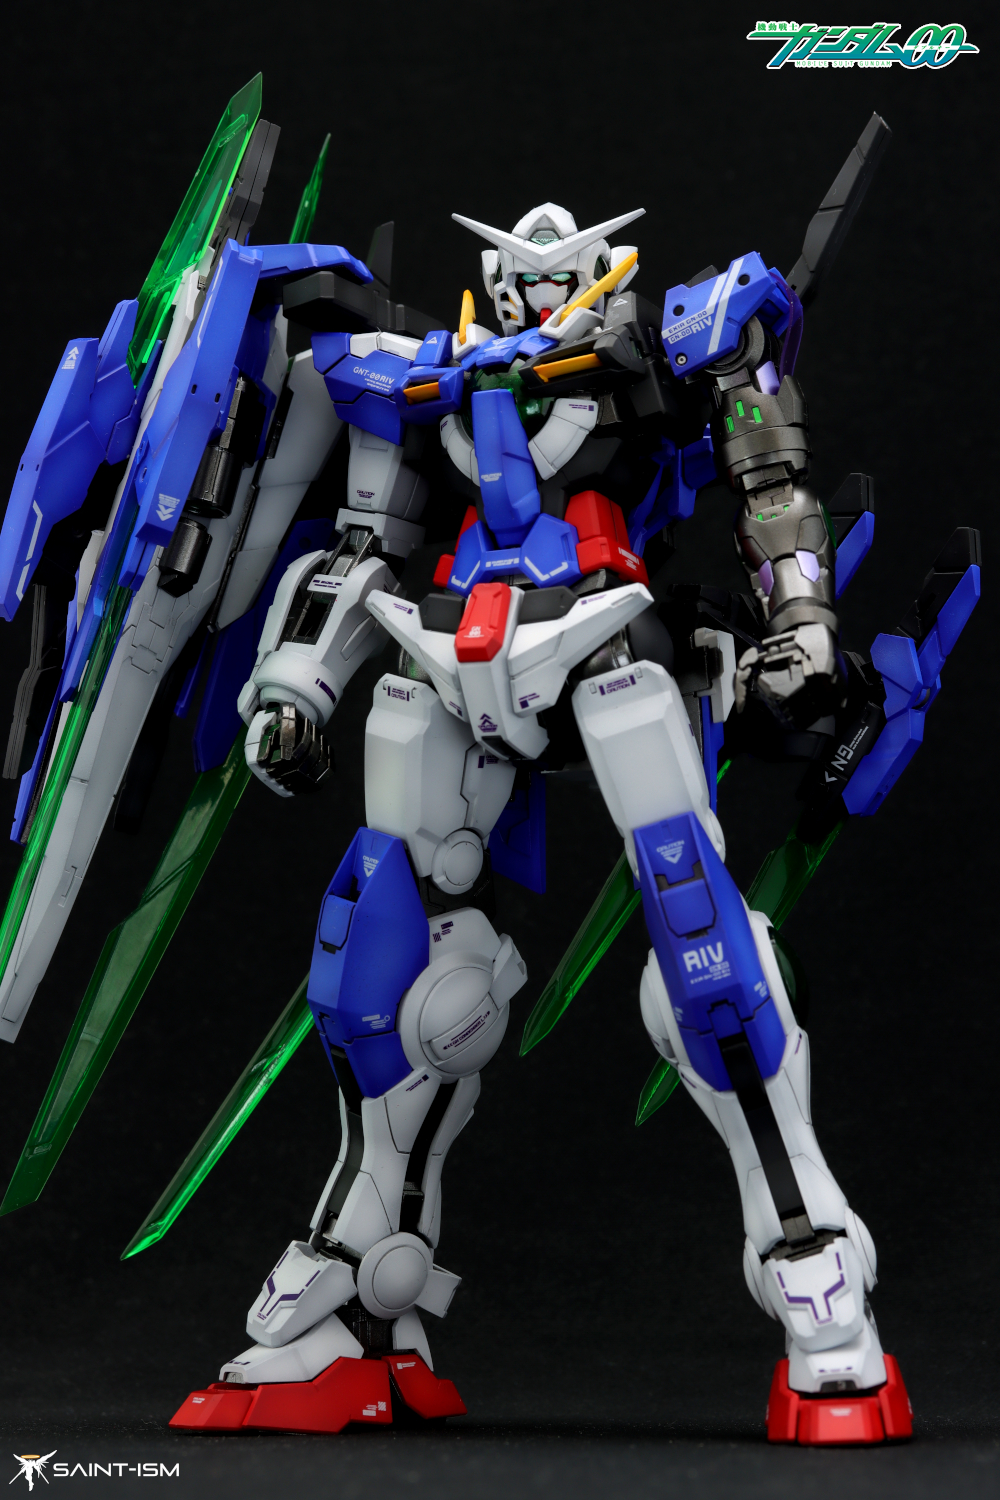
The GN Shield mounting parts require you to remove/omit the little clips that hold the GN Drive in place (E16/17), and the part which holds the shield slots into the resulting gaps. The part which holds the GN Tachi also requires you to omit/remove the cone of the GN Drive (parts J7/I2), and it slots into the resulting gap. If you are using the PB Exia R3 like I am, note that you’ll need to build the torso using the original Exia’s D1 part, as the R3’s version does not have these slots. The shield is pretty heavy and as with the Qan[T] may cause the torso to lean off to one side. I did stuff some extra Blu-tack in the chest to firm up the side-to-side articulation and it seems to have done the job for the most part. I also found that the articulated points that hold the shield were extremely tight, so much that I’d advise against playing with it too much.
Fitting wise there were some pretty tight squeezes. In particular the GN drive unit that slots into the GN Shield (Step 18) got kind of scratched up while putting it in and the fit was pretty tight when trying to rotate it. I’d maybe try sand the sides of this part slightly next time. Putting together the various GN Blades needed some gentle squeezes with wrench pliers to get to parts to sit flush, and there one blue piece on the GN Bayonets that require you to push it past part of the grey part of the handle which resulted in some paint scratching.
During assembly I also had quite a bit of trouble getting the 4 blades to connect to the shield, the Swords are held in place with a C-clip, and I found that you needed to push the Blades extra hard to connect fully. As a result they stay on pretty well compared to Bandai’s version, but I wouldn’t risk pulling them off again. For the clear green blades, they use a much thicker plastic than the one on the MG Qan[T] and they won’t break easily.
The GN Bayonets also use one of the smallest C-clips I have ever seen as the connection point to the skirt arm, I’d be extra careful painting or playing around with this part.
The metallic arm looks great and I’ll say that it’s one of the coolest things about this set though it can’t do a full 180. The clear green lenses that go in the arm were also a bit scratched up and cloudy, I had to polish them quite a fair bit to make them somewhat clear again. You get stickers for the little green and metallic purple details, the green stickers are extremely tiny and can easily get lost if you’re not careful.
The replacement shoulder that uses the base frame was the worst part of this set, at least in my experience. The peg holes where the shoulder frame goes into, are too big to fit Bandai’s Exia/Qan[T]/00 Frame. Therefore you’ll need to either bulk up the pegs on the Exia frame or reduce the the size of the holes on the replacement shoulder otherwise the shoulder armor will be pretty loose. It’s entirely possible that people using Daban/Hobbystar won’t have this issue but I can’t comment on that.
Finally the back skirt isn’t secured all that well and will fall off the frame easily unless glued in.
Overall, the expansion gets you most of the way to a true Exia R4, but you’ll need an Exia R3 and a Qan[T], and you’ll have to do some modding to get everything attached. I didn’t do any real modding or extra sanding and everything mostly went together albeit a bit tight in certain areas. I would feel pretty nervous posing it or removing the blades from the shield due to the C-clips but otherwise it’s a pretty decent set.
Painting
White – Mr Color 306 base coat, followed by Mr Color GX Cool White
Blue – White primer, Mr Color Blue + bit of Fluro Pink + bit of purple. White added for highlights, then original colour used to postshade/blend
Red – White primer, Mr Color Shine Red, Russet post shade, Mr Color GX Yellow pre-highlight, followed by light coat of Shine Red, GX Harmann Red
Left arm steel – Gloss black base coat, followed by Mr Color Super Metallic Iron + Mr Color GX Black
Internals – Gaianotes Starbright Iron + bit of Mr Color GX Black