I’m going to trial a new approach when it comes to documenting my builds. Since god knows when I’ll actually get to taking proper pictures of all my kits, I’m doing to do these post-mortems after each build while the experience is still fresh in my mind.
So basically here are the paint mixes I used:
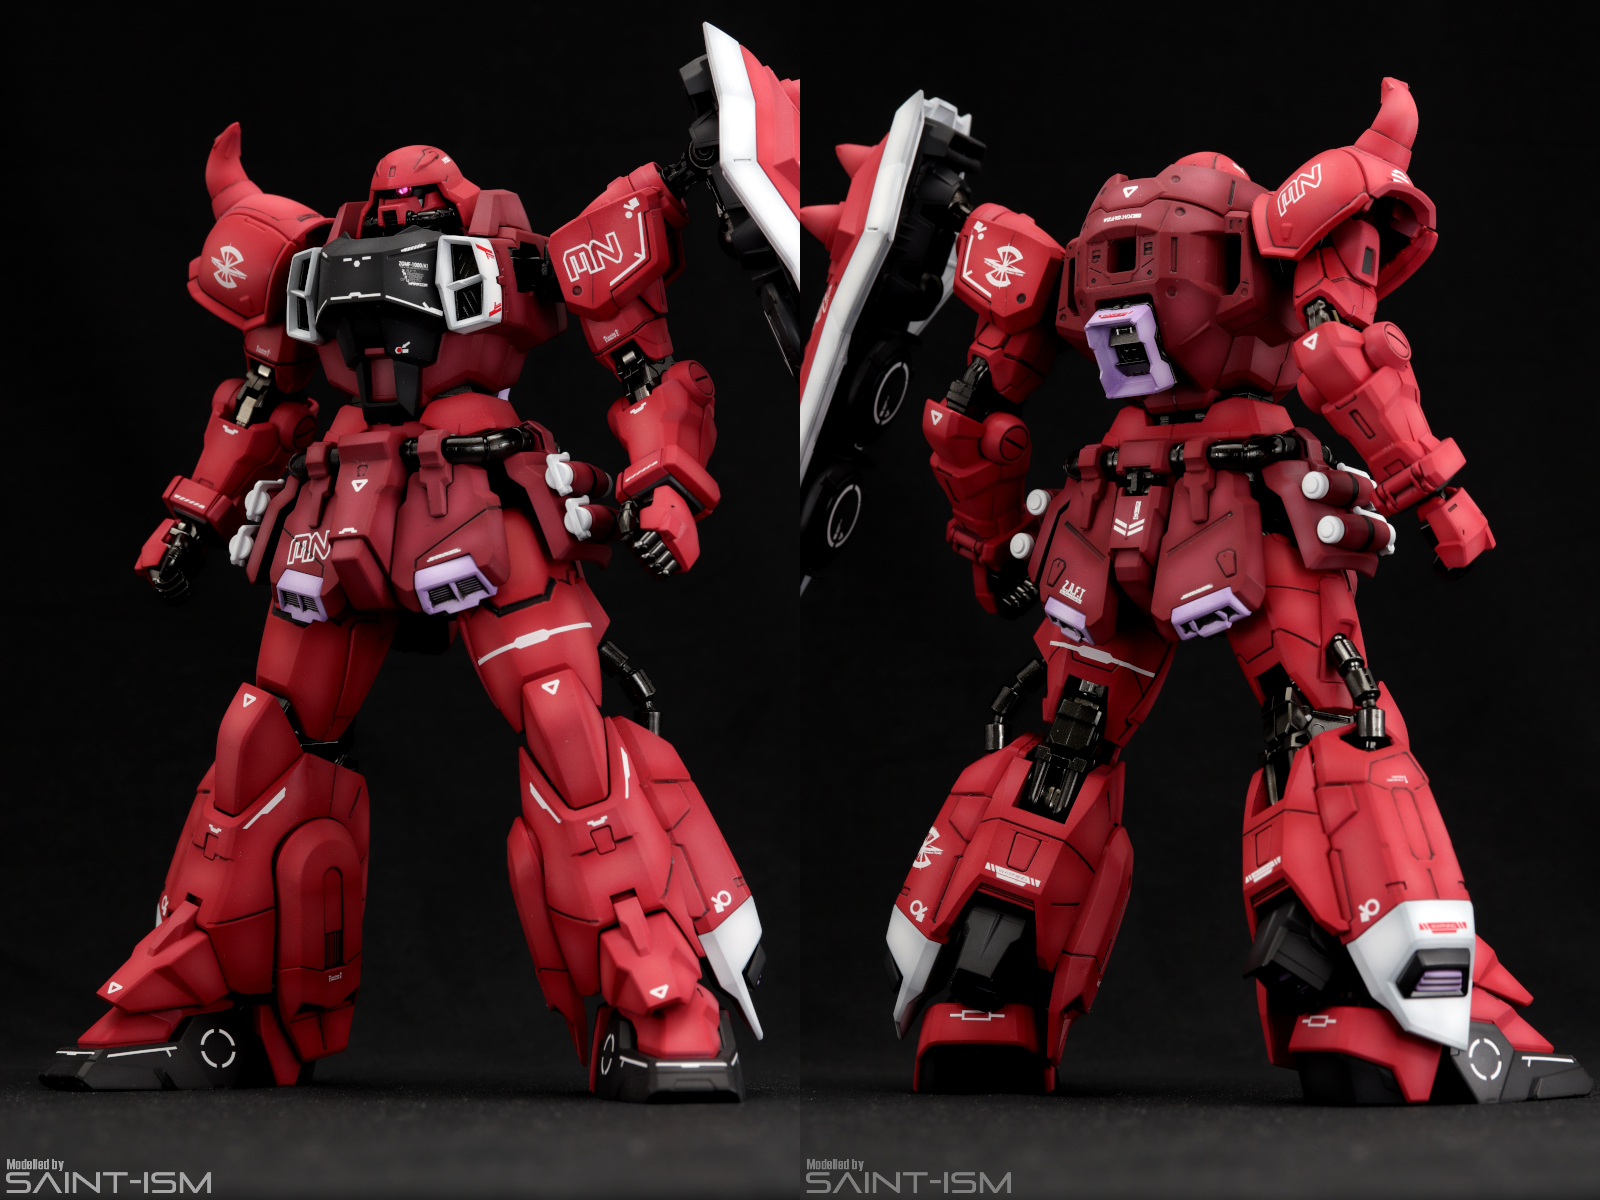
The manual recommends Salmon Pink 75% + Russet 25% for the pinkish red, however there is no lacquer Mr Color equivalent for the Salmon Pink. I substituted Gundam Color Char’s Pink instead, and the mix was swapped around (75% Russet with 25% Char’s Pink). I then added yellow + white for shading, but this didn’t turn out quite the way I wanted, so I had to do quite a lot of corrections. I ended up having to mist a Russet + Yellow mixture over and kind of post shade with this colour on the edges as well as more highlights.
The dark red is Russet plus a bit of black, my first attempt I added too much black and I ended up with a dark purplish red instead. I then added yellow and a bit of white for shading.
The purple is White + bit of russet and a bit of purple. I then added more white for shading. For the front skirts, I first painted the back a dark frame grey, masked it off and then painted the purple parts.


This kit reminded me that Red is probably my least favourite colour to paint and I think on most if not all of the Red colour MS I’ve painted I’ve never been able to get it right on my first go. As a note to myself, never add white without adding yellow first if trying to shade red, and adding black to red makes it purple. If you want a darkish red it’s better to add green instead.
For the internals, I used Gaia Gunmetal, for the more visible parts like the cables and knees, I used a very light mist of SMS Stainless Steel over a gloss black.
For the monoeye I used one of these stickers I recently bought from Delpidecal. Once I applied it to the camera the clear piece A7 couldn’t fit anymore so I just left it out.
Also the Wizard Gunner has some of the worst seams in any modern MG kit, so I had to do the following:
- Fix seam J15+J16 with B23 assembled inside (Step 13-4)
- Trim pegs on G1-1 (scope), this will allow it to be easily installed after painting
- Fix seam J6+J7 (omit I2-5) (Step 13-5)
- Fix seam J4+J5 (Step 13-7)
- Cut piece I2-5 (the red gun sight) in half, so that the triangular piece can be slotted in after the seam is fixed and painted
- Install step 13-4, 13-5, 13-7, J10 and seal seam J2+J11
- Once the gun is painted I2-5 can be installed.
For the sight, I first painted the blue sensor where the sticker normally would go, did a black enamel wash, then masked it off and painted the white.


Beautiful job on this Zaku Warrior! I myself am about to tackle this kit and like you I had to substitute the Aqueous Salmon pink for Char’s pink (great minds think a like)…
I was curious about if you did any pre shading and what color(s) of primer did you use on the red armor parts?
I just used normal grey primer (Mr Surfacer 1000).
The red is a custom mix using Mr Color paints, I used the recommended mix from the manual as a base.
As for preshading, yes I kinda do it but I paint the entire part rather than just the edges first.
Base colour = Russet (75%) + Salmon Pink (25%). I didn’t have Salmon Pink so I substituted it with Gundam Color Char’s Pink.
Highlight Colour = Above mix, but add some yellow, then white
Step 1. Paint entire part with base colour
Step 2. Use the highlight colour to spray the highlight in the centre of each panel (lightened areas)
Step 3. Use the base colour again to post-shade the edges, and lightly mist over the rest of the part to blend in the highlight if desired
Beautiful job on this Zaku Warrior! I myself am about to tackle this kit and like you I had to substitute the Aqueous Salmon pink for Char’s pink (great minds think a like)…
I was curious about if you did any pre shading and what color(s) of primer did you use on the red armor parts?