Welcome to the next part in the Gunpla and Figure Photography series. This time we’re going to talk about DSLR cameras, whether you should buy one, the differences between a DSLR and a normal camera, and where to start looking.
Should you actually buy a DSLR?
The fact that you are reading this guide might mean that you’re considering it but are either unsure of what to buy or are somewhat on the fence due to the price.
Here are some more questions you should first ask yourself to help decide:
- Do you spend a lot of time detailing/scratchbuilding/painting scale model kits?
- Do you have a blog where you routinely post your work?
- Do you know how to use the manual mode on a camera?
- Do you offer commission services and maintain a portfolio of your works?
- Do you have a photography booth set up for taking pictures of your Gunpla?
- Do you enjoy photography in general?
- Do you have an obsession with getting the highest image quality out of your photos?
These were some of the things that drove me to my DSLR purchase and if you’ve answered yes to a few of these questions your answer might be leaning towards “yes” as well. Otherwise you may not be quite ready for the investment and you could easily get by with a point-and-shoot camera as I did for many years and reconsider later.
I personally believe once you reach a certain skill level that you should invest into some proper equipment to ensure that your work is photographed and captured properly. In fact I often wish I could go back and take pictures of my older kits with my current DSLR setup.
What’s the difference?
Fair question! After all my DSLR is 18 megapixels and the camera in my Google Pixel is 12 MP. Surely there can’t be that much of a difference between the two?
The truth is that megapixels actually don’t matter as much as the size of the sensor in the camera itself. A DSLR sensor is about 8 times the size of a portable camera, and about 16 times the size of the sensor in your camera phone. This translates to better color reproduction, better sharpness, and less distortion, especially in low light scenarios.
See this Photoseek article for sensor size comparisons.
You also have much better control over aperture and exposure time. With point-and-shoot camera at high focal lengths you sometimes lose access to smaller aperture settings.
Finally DSLRs give you access to taking pictures in RAW file format which allows for great flexibility during post-processing.
Direct image comparisons
Now for a 1-1 image comparison. Here’s the same kit taken with both my Powershot and the 700D:


And if we zoom into the same images:

Apart from resizing down by 50% these are unedited images from each camera. It was hard for me to replicate the same shot exactly due to having to remount the cameras on my tripod. White balance aside, you can see the blacks are darker and the colours are richer on the DSLR shot. You can also see that the image is sharper if you look at the PSA logo on the front skirt.


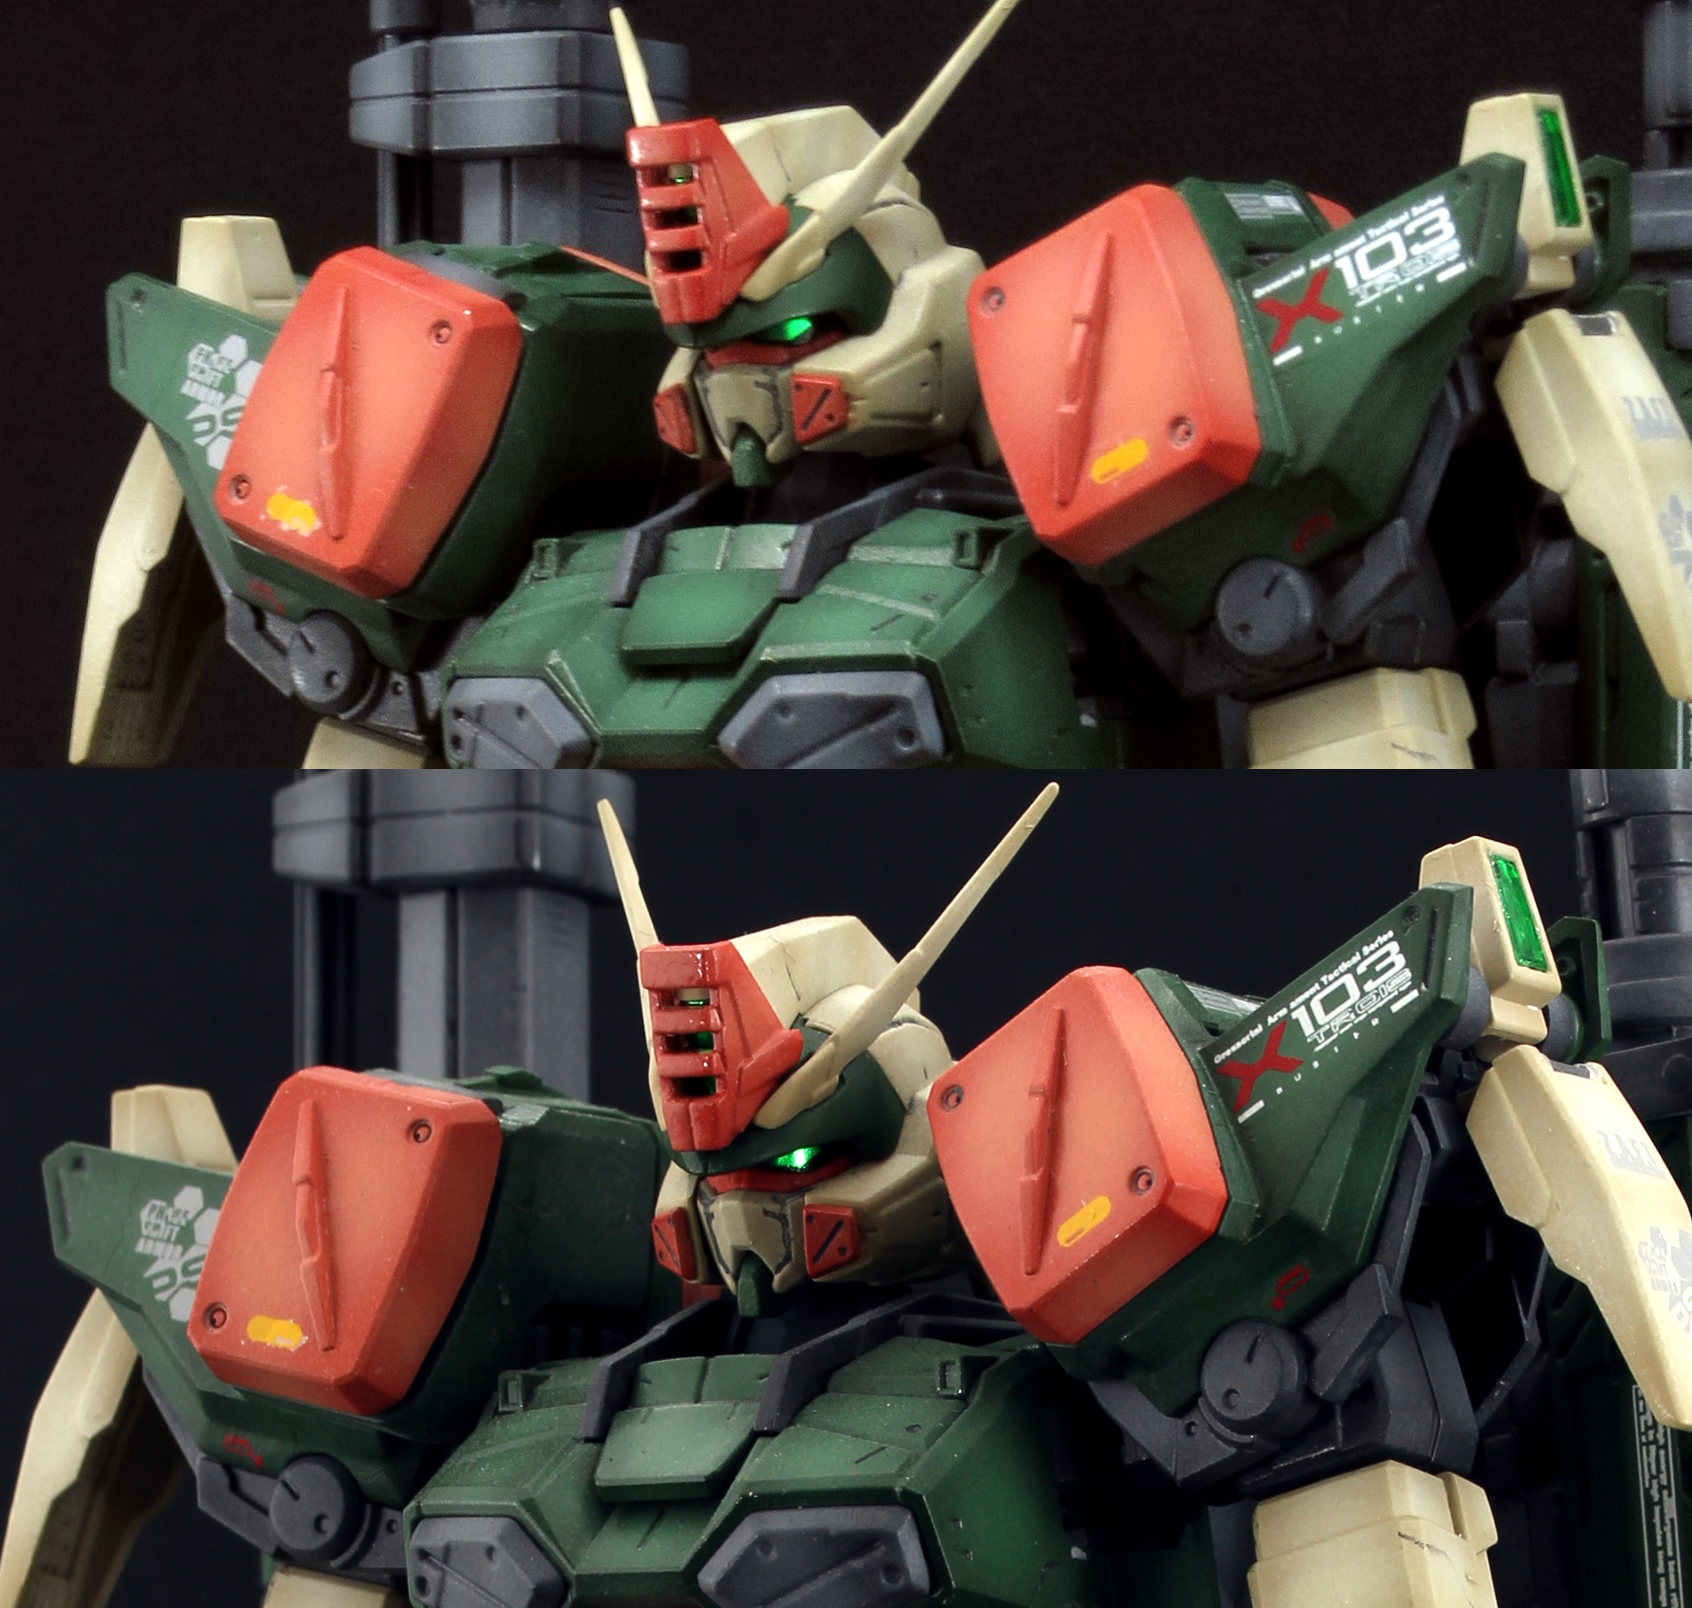
Here is another comparison shot, this time using my Buster Gundam. I took the following two portrait images at original size and cropped them so they were roughly the same size. The top picture is from the original photoshoot back in 2014 and the bottom is one I took very recently with my 60mm macro lens. The difference is very noticeable – the panels on the face are much clearer and the writing on the decals are now legible.
Convinced yet? Well read on then!
Which DSLR to buy?
Canon and Nikon produce the most well-known entry level DSLRs on the market. I’ll provide some starting models for you to look at, but it’s up to you to do further research. Keep in mind that lenses are not cross-brand compatible so whichever brand you choose you’re more than likely to stick with. It’s a pretty tough choice that you have to make, personally I’ve been using Canon since 2012, so there was some bias there from me.
DSLRs come in two components, the body and the lens. Be aware when buying that lenses are usually purchased separately, normally the camera itself is marked as “Body Only”; if you buy these, you’ll still need to purchase a lens separately. Deals that include lens kits are pretty good value for beginners and save you some hassle.
A good site to use to quickly compare camera models is Imaging Resource.
Features to look out for
I’m going to provide a list of smaller-known features that might help you decide on which model to purchase.
WiFi/Bluetooth Connectivity
The WiFi and Bluetooth features generally allow you to hook up the camera to your phone or PC where you can preview files, control the camera remotely or transfer images. It’s a very convenient feature for proofing images and it saves you having to remove the memory card, insert into your PC every time you do a test shot.
I can’t count the number of times I’ve had to reshoot because of stray dog hairs or a misplaced limb!
Electronic Level
One feature that was on my old Powershot that’s missing on my 700D is the electronic level (also sometimes known as horizon line) function. When turned on, this displays a line on your LCD or viewfinder which tells you if the camera is level or not. It’s pretty useful for standing shots to make sure your Gundam doesn’t look like it’s leaning off to one side.
Don’t worry if you it doesn’t have it though; you can still purchase 3rd party flash mounted spirit levels, or fix errors in post-processing.
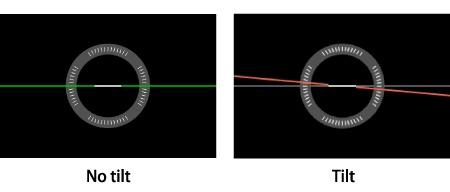
Example of electronic level on the Canon 800D
Video capture framerate
Are you planning on using this camera to take video? If so take note that older models such are the D3300 and 700D only do 1080p at 30 frames. It’s also highly unlikely that you’ll be able to get a DLSR that does 4K video in the beginner price range.
Flip-out LCD screen
This is a feature you’d expect to see on a camcorder but some DSLR cameras also have this.
Touch screen
Whether or not the LCD screen is touch-sensitive.
HDMI-out
This lets you hook up your camera to a TV or HDMI-enabled monitor so you can preview images on the fly.
Entry level models to consider
Canon EOS / Rebel TXi series 700D/750D/800D
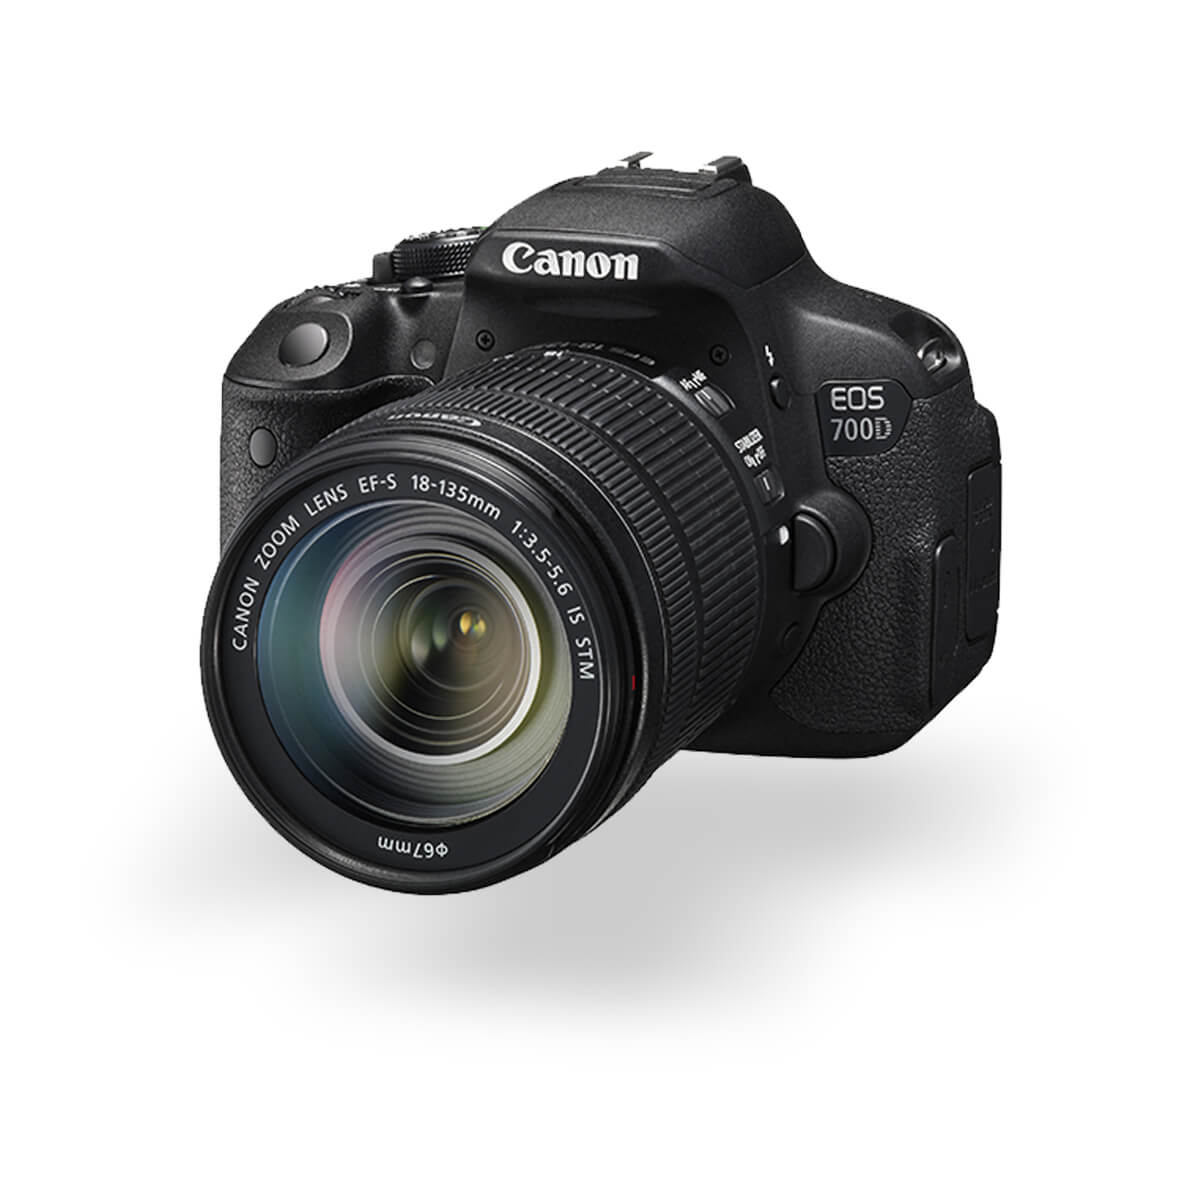
The Canon EOS 700D (T5i) is the one I personally use. It’s dated, but it’s fairly cheap these days (around 600USD with a lens bundle). Since I bought it in 2015, Canon have released updated models 750D, 800D (T7i) etc. These have better sensors that give better quality and other features like WiFi but are more expensive. Niceties, but not essential if you’re on a budget but if you can afford it I’d say go for the 800D.
Canon for some reason have different branding for this model depending on where you live. In the US the 700D is more well known as the Rebel T5i, with later models having bigger number like T6i etc.
Nikon D3300/3400
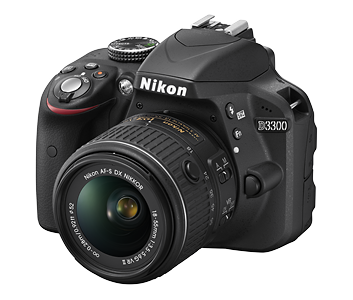
The D3300 is a basic model often see mentioned alot by Gundam photography enthusiasts. The camera and lens kit can be found for sub 600USD on Amazon. The D3300 has been superseded by the D3400.
All entry-level DSLRs are cropped-frame cameras. These all use the APS-C sensor which has a crop factor of 1.6.
Purchasing a lens – Zoom or Prime?
If this is your first DSLR purchase this question may not even pop into your head. If you went with a lens kit purchase, you probably got 1 or 2 zoom lenses with your camera which should be more than enough to cover your needs for now. Lenses by themselves are not cheap and in most cases cost more than the camera body itself.
Zoom lens
Zoom lens allow you to do just that. They are marked with focal length range eg (18-55mm, 55-100mm) that allow you to “zoom” in and out without having to reposition your camera. It’s very convenient and a good way to ease yourself into the world of DSLR photography.
Prime lens
Prime lens however, are fixed at a particular focal length. This means you must now physically move your camera back and forth to get whatever subject you’re shooting into frame. The upside of a prime lens is that you get superior image quality because there is less diffraction caused by the extra glass in the zoom lens. Additionally prime lenses tend to have better performance in lower light conditions compared to zoom-lens.
Consider getting a prime lens as your upgrade path, as it quite a bit of an initial outlay for a beginner to shell out.
Comparison

Here’s final comparison shot. The first shot is using my Canon Powershot, the second is from my 700D using the 18-55mm zoom lens (at around 40mm), and finally the 700D using a 60mm macro prime lens. The jump from the zoom to the macro lens is quite subtle but I feel the image “pops” out a bit more. When we don’t max out the focal length on a zoom lens the image is still quite comparable to the prime lens.
Things to consider when buying a prime lens
If you’re like me and you’re finally thinking about moving on to the next level, then prime lens are the way to go.
Macro lens
If you’re thinking about getting a prime lens, then you might want to consider a macro specific one. These provide the best image quality for photographs taken at very close distances.
The downside is that the choice for focal lengths macro lenses are rather limited.


Another comparison shot. The first is from my 18-55mm zoom lens at maximmum zoom of 55mm. The second is from my 60mm macro lens. At this range the details on the macro lens are much clearer.
Focal length
It took me quite some time to understand what focal length was and what the numbers meant, but I’ll try give you the most basic explanation I can. Basically when you zoom in and out you are essentially altering the focal length. A low focal length like 18mm will give you a nice wide shot (good for landscapes), as you increase the focal length you are zooming in and magnifying the image while also narrowing your field of view.
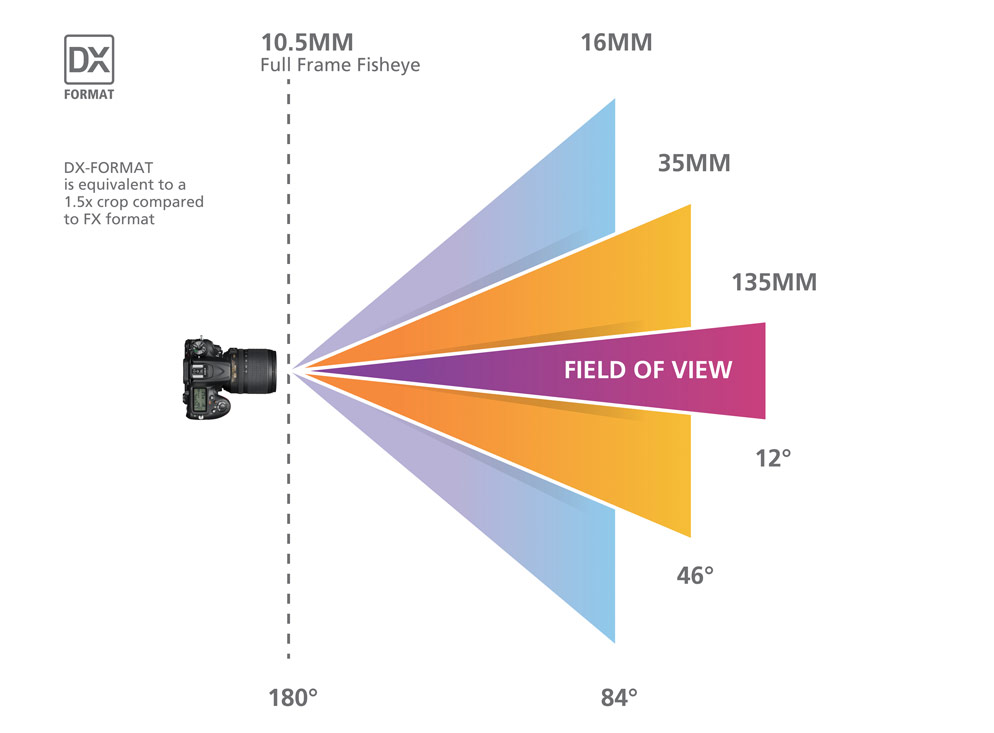
See the Nikon website for a more detailed explanation if you’re interested).
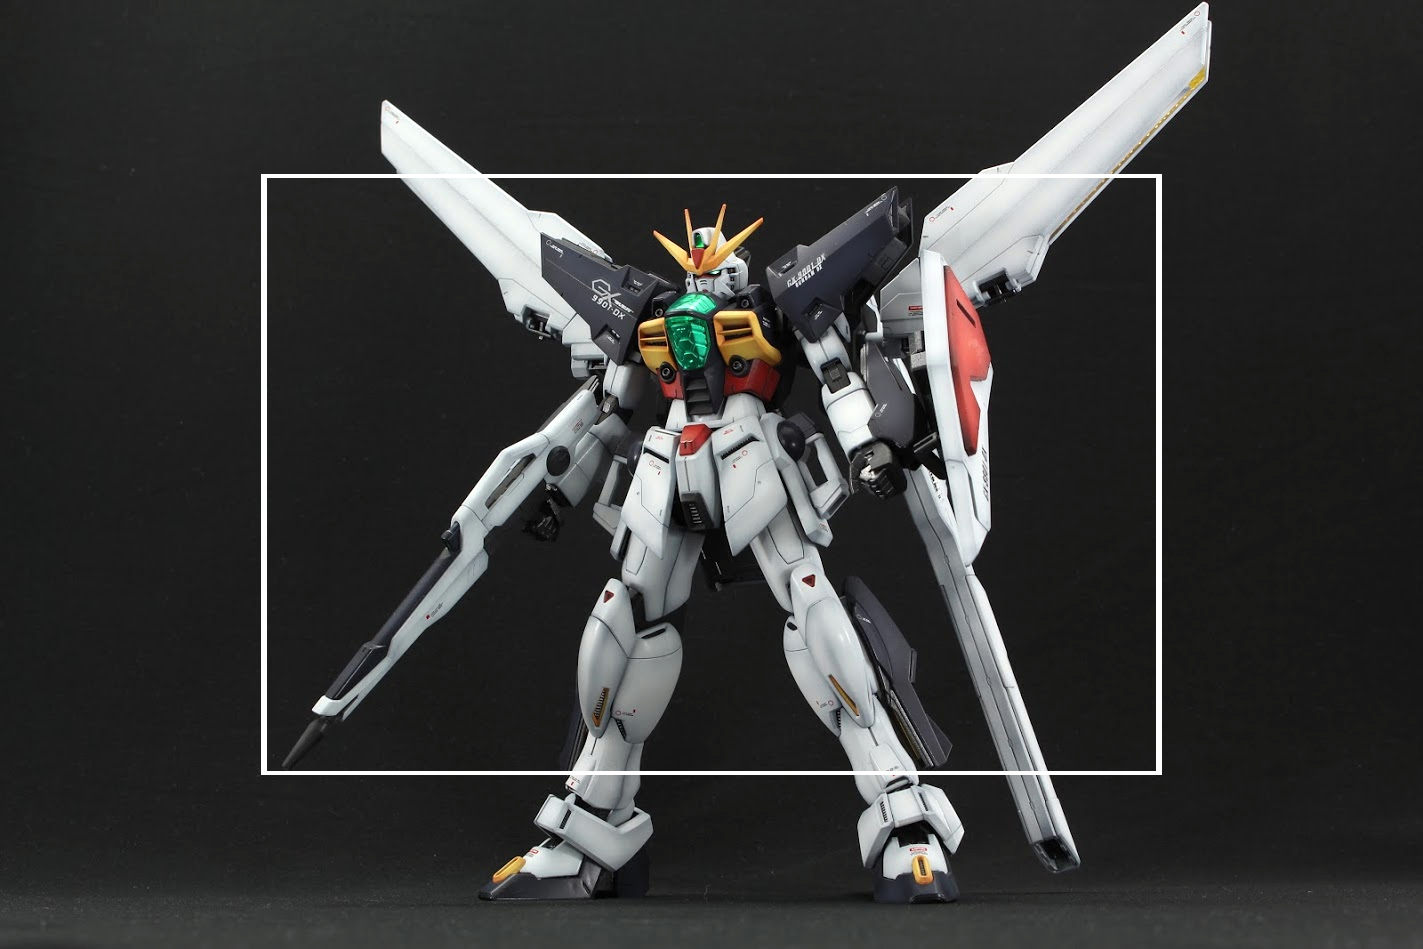
For our purposes I believe the sweet spot is around 60mm. Any higher and you’d have to stand quite far back to take full frame landscape pictures of your Gunpla.


An example of how far a 60mm lens has to be positioned to get a full frame portrait and landscape shot of the 1/8 KOS-MOS figure.
Consider your workspace and what kind of kits you mainly work on when choosing which focal length prime lens to buy. If you work with mainly 1/144 kits and you want to get some closeup shots, then a 60mm lens might be better for you.
Minimum focus distance
One rather overlooked specification of a lens you might want to look out for is the minimum focus distance. It’s how close you can get your camera to an object and still have it in focus. For example the minimum focus distance on my 18-55mm lens is 25cm as per Canon’s website, so you can’t get any closer than that for any closeups. This will give you a rough idea of how far you will have to be from your model to photograph it. Macro lenses usually have a very short minimum length, so you can go really close to see those details!
Make sure it’s compatible
If you want to save some money you can purchase 3rd party lenses for your camera. When doing so make sure first it’s compatible with whichever camera model you have! This also applies to branded lenses as some are made for full-frame DSLRs.
Other accessories
Spare batteries
Consider getting some extra batteries to extend your photoshoots. Third party batteries can be found on eBay for a fraction of the cost, but be sure to look up reviews on build quality first.
Lens cleaning kit
Kits cost about 15USD and typically include cleaning fluid, a cloth and a brush. They’re used to help dust off and remove fingerprints from lenses.
Memory cards
Most DSLR cameras use SDHC/SDXC memory cards. If you shoot in RAW format it’s usually about 20Mb per image, so it might be worthwhile getting a few extra memory cards. I have 3 memory cards that I cycle between.
Tripod
If you don’t already own a tripod then you’ll definitely need one to take full advantage of your new toy!
Camera bag
I don’t have one personally since my camera is only used for my Gunpla photography, but if you’re looking to take your camera out and about you might want to get yourself a bag that can hold your camera and lenses.
Other questions
What’s full-frame and cropped-frame?
Good question! Full and crop are terms used to refer to the size of the sensor in the camera. A “Full” frame sensor is the same size as 35mm film used on old cameras. Full-frame cameras are considered top-of-the-line and probably well out of your price range. Because the sensor is larger you get the best image quality, but this also means the lenses are gigantic and also very expensive.
In the image above I’ve simulated what a picture taken by Crop frame camera looks like against a Full frame camera. The average crop frame camera has a crop factor of 1.6, meaning the sensor is 1.6 times smaller.
What does this mean though? In the grand scheme of things not much. Apart from the image quality all this means is that you’ll need to stand further back in order to get the same shot using a crop camera as a full frame camera.
Some full frame lenses are also compatible with crop cameras. For example the Canon EF full frame line of lenses can be used on the EOS/TXi line of cropped cameras, but because the sensor is smaller than the lens the effective focal length is different. For example if you were to use a 100mm full frame lens on a crop camera with crop factor 1.6, you’d only get a 160mm equivalent crop frame lens (100mm * 1.6 = 160mm).
Final Words
Phew, that was quite an info dump! I hope this guide has helped you decide on whether you should get a DSLR camera or not. Please let me know in the comments section if you ended up taking the plunge and which model you got!
Also please consider becoming a Patron or donating if this guide has helped you! Thanks!
